1 Requirements
See Requirements.
2 Getting Starting
Firstly make sure that you have all the necessary requirements. If you are on working on Linux either install the RPM package of ASR-Builder or extract the source from the source archive. Run
python setup.py install
to install the package from the source. Windows users need to run the installer, ASR-Builder-0.1.win32.exe, which will take you through a step-by-step process to install the application.
To run ASR-Builder, in Linux, type:
asr-builder
on the command line. If no CLI arguments are provided, ASR-Builder will start in in its GUI mode. To run ASR-Builder on the command-line, one needs to use one of the CLI command options. ASR-Builder has 9 command options: -P/--project, -A/--acousticmodel, -L/-languagemodel, -R/--runscript, -V/--removemodel, -M/--modify, -I/--ViewInfo, -C--configure and -h/--Help. ASR-Builder has more variable options that need to be used in combination with the command options. Please refer to the CLI help for more information on these options (asr-builder -h/--help).
For Windows users, the script is located under '<Python install path>\Scripts'. Use Python to run the script ('asr-builder'). All the command-line arguments given above will work as well.
(back to the top)
3 ASR-Builder Graphical User Interface
Before one can create, train or test acoustic and langauge models or do anything
else for that matter, a project needs to be created. ASR-Builder can only have one project open
at a time. But each project can have multiple acoustic and language models.
The main window (shown in Figure 1) has two tree views. The 'Project models' view, on the
left-hand side, contains the acoustic and language models in a project. The 'Selected model
contents', on the right-hand side, shows the files and folders within the model selected
(highlighted) in the 'Project models' view. The 'Remove' button allows the user to remove the
selected model. The 'Refresh' button refreshes the list of files and folders that a model
contains. The 'View' button opens the selected file in a basic editor.
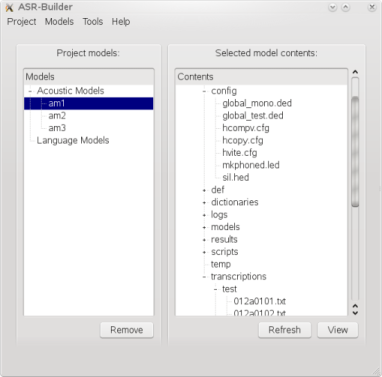
Figure 1: ASR-Builder main window, with a project already open.
3.1 Projects
3.1.1 Creating
To create a project, select the 'New' option from the 'Project' menu, or press 'Ctrl + N'. This will open the dialog (see Figure 2) which allows a user to create a new project. The dialog requires a name for the project and a directory location, where the project will be saved.

Figure 2: The new project window.
3.1.2 Opening
To open a project, select the 'Open' option from the 'Project' menu, or press 'Ctrl + O'. This will open the dialog (see Figure 3) which allows a user to open an existing project. The dialog requires the name of the project file (.proj) for the existing project that should be opened.
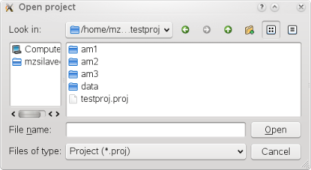
Figure 3: The open project window.
3.1.3 Saving/Closing
There is no need to save a project as the system autmatically saves all changes. To close a project, select the 'Close' option from the 'Project' menu, or press 'Crtl + C'. If a you close a project, you will be prompted to save the project before it is closed.
3.1.4 Removing
To remove/delete a project, one needs only to delete the directory where the project is saved.
(back to the top)
3.2 Acoustic and Language Models
3.2.1 Creating an Acoustic Model
To create an acoustic model, make sure that project is open, then select the 'Acoustic' option from the 'Models' menu, or press 'Ctrl + A', this will bring up the dialog (see Figure 4). There are several fields that need to be filled in. The first field is the name of the model, note that no two models can have the same name. The next field is the dictionaries field, you can add one or more dictionaries for the model, or even a file that contains a list of the dictionaries to use. A file containing a list of dictionaries needs to have a '.list' extension or else it will be treated as a dictionary. For the audio data, either the directories containing the training and test data must be added to the respective fields or a file containing a list of audio files to use. If you check the 'MFCCs' box, the system will treat the audio files as being already converted into MFCC format. Specifying an extension is optional but if no extension is specified then all the files in the specified directories are assumed to be audio files. For the transcriptions, either the directories containing the training and test transcriptions must be added to the respective fields or a file containing a list of transcription files to use, as was the case with the audio data. Specifying an extension is optional but if no extension is specified then all the files in the specified directories are assumed to be transcriptions. Specifying extensions is useful if a directory contains different types of files and data. If you have a file containing questions (for tying bi-phones and tri-phones), it can be specified in the relevent field. The questions file is optional and can be added later to an acoustic model. The type of acoustic model is determined by the script you run to train the model.
Important: Altough specifying extensions for data is optional the data is expected to be in certain formats. Audio data is expected to be RIFF Wave files, if you want to use a different format, then you should change the parameters for HCopy. Transcriptions are expected to be plain text although ASR-Builder can remove punctuation and change the case, if specified.
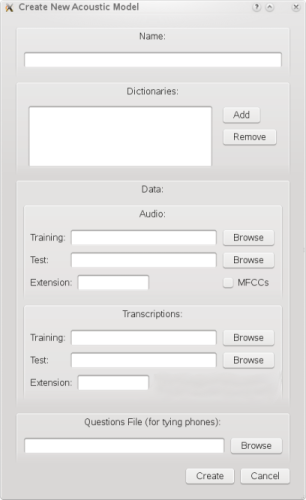
Figure 4: The new acoustic model window.
3.2.2 Creating a Language Model
To create an language model, make sure that a project is open, then select the 'Language' option from the 'Models' menu, or press 'Ctrl + L', this will bring up the dialogue. There only two fields that need to be filled in. The first field is the name of the model, note that no two models can have the same name. The second field is the source of data for the language model. This can be a file or a directory containing multiple files. What data you provide depends on the type of language model you wish to create. The type of language model is determined by the script you run to train the model.
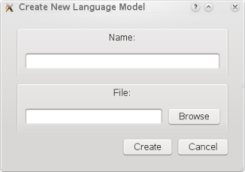
Figure 5: The new language model window.
3.2.3 Running a Script
Once an acoustic or a language model has been created, you can run various scripts to train, test, recognise or do pretty much anything else that you require. ASR-Builder comes with a few basic scripts that you can use. You are also free to create your own scripts. To run a script select the 'Run script' option from the 'Tools' menu, or press 'Ctrl + R', this will open a dialogue (see Figure 6). You can choose a script from one of two locations. The first, and default, is an internal ASR-Builder script. These scripts come with ASR-Builder and provide basic training, testing and recognition operations. The second option is a custom script, these scripts are created by you and located in any specific directory and do not have any specific extension. Once a script is selected and you press the 'Run' button, a window is opened displaying the contents of the selected script as well as the HTK configuration parameters for the currently selected model. For more detailed information on creating scripts, see Section 7.

Figure 6: The run script window.
3.2.4 Modifying a Model
To modify a model, select the model in the 'Project models' tree, on the left side of the main window, and select the 'Modify' option from the 'Models' menu, or press 'Ctrl + M'. This will display a dialogue (see Figure 7), where you can select the type of data, the data, the tag for the data and where the data should be stored. The type of data can be audio data, transcriptions, a file or a folder. The reason for having audio data and transcriptions is that ASR-Builder will do the same processing of these data sources as when a new acoustic model is created. The 'Tag' field allows you to enter the tag that you wish the new data is associated with in a model. The source/location of the data is entered in the 'Data' field. An optional field, for 'File' or 'Folder' data types only, is the 'Copy location' field. This allows you to specify a specific location within the model.
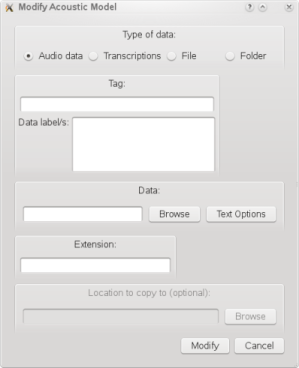
Figure 7: The modify window.
3.2.5 Configuring a Model
To configure a model, select the model in the 'Project models' tree, on the left side of the main window, and select the 'Configure' menu from the 'Models' menu. This will give you a menu with three choices. You can load or save a configuration or view the current configuration and make changes to it. The 'Load Config' ('Ctrl+F') option allows you load a file containing multiple configuration parameters for multiple HTK tools. The format of the file is, one configuration parameter per line, in the form 'TOOL:PARAMETER:VALUE:DELETE'. The fields are as follows:
- TOOL - Name of the HTK tool.
- PARAMETER - Name of the configuration parameter.
- VALUE - Value for the configuration parameter
- DELETE - If the paramter should be deleted or not, if it exists already. If the is true ['true' or 't'] then the VALUE field can be left blank.
To save the configuration to a file, select 'Save Config' or press 'Ctrl + G'. To view the entire configuration, select 'View Config' or press 'Ctrl+W'. Each tab in the window is for a separate HTK tool. The configuration can also be changed in the view configuration dialog.
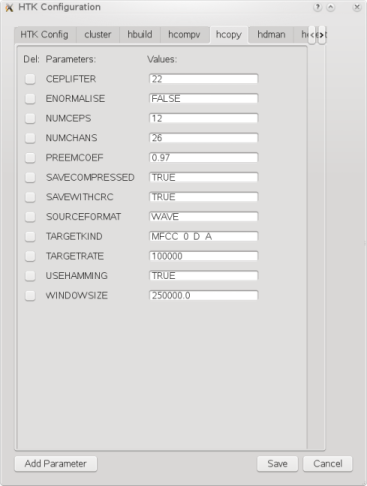
Figure 8: The configuration window.
3.2.6 Viewing Model Keys
To view the keys for a model and their associated values, select the model in the 'Project models' tree, on the left side of the main window, and select the 'View Keys' option from the 'Models' menu, or press 'Ctrl + K'.
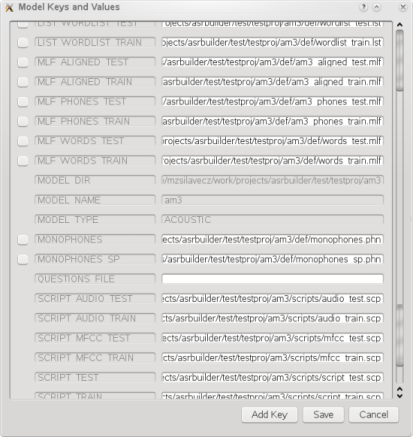
Figure 9: The model key viewing window.
3.2.7 Preprocessor Options
The preprocessor can be used to substitute text in transcriptions and check the transcriptions for missing words. The substitution mechanism uses regular expresion to search for text to replace. Each regular expression and replacement text pair is specified in the appropriatiate text box (see Figure 10) and then added to the list. If a regular expression exists in the list, it is overwritten. NB: Single quotes (') cannot be used. There is an option to perform a word check on the transcriptions. A file is created, that lists the transcriptions that have missing words and the words that are missing. The file is located in the model's folder and is called 'missing_words.txt'. Also it creates two sets of lists of transcriptions (for training and testing), one that can be used immediately to train/test a model and one with the transcriptions that contain the missing words.
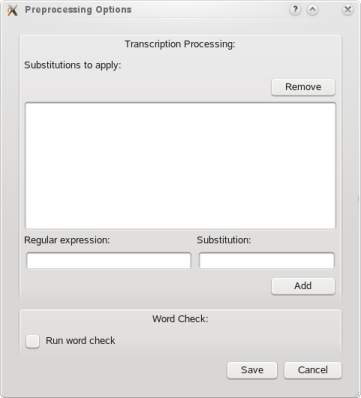
Figure 10: The preprocessor editing window.
3.2.8 Removing
To remove a acoustic model, select the model in the 'Project models' tree, on the left side of the main window, and either press the 'Remove' button or select the 'Remove' option in the 'Models' menu.
(back to the top)
5 Command Line Interface
All the options available for the ASR-Builder CLI.
| Option | Brief description |
| Command Options | |
| -P / --project | Create a new project. |
| -A / --acousticmodel | Create a new acoustic model. |
| -L / --languagemodel | Create a new language model. |
| -V / --removemodel | Remove an acoustic or language model. |
| -R / --runscript | Run a script. |
| -M / --modify | Modify an exsiting acoustic model. |
| -I / --viewinfo | Display information on the specified model. |
| -C / --configure | Change the HTK configuration for the specified model. |
| -O / --preprocessor | Change the preprocessor configuration or run the preprocessor for a model. |
| Variable Options | |
| -a | Specifies the folders that contain the audio data or a list of files(training and test). |
| -c | Specifies a file to save or load for the HTK/preprocessor configuration |
| -d | List of dictionaries. |
| -e | Extension of the audio files. |
| -f | Specifies the type of information to display. |
| -g | Specifies the tag/label when modifying a model. |
| -h | Displays help. |
| -i | If specified, prevents the program from asking for user input. |
| -l | Specifies the location to store new data. |
| -m | Specifies that the audio files are already in MFCC format. |
| -n | Specifies the model name. |
| -p | Specifies the project file. |
| -q | Specify the questions file (for phone tying). |
| -r | Specifies script file to run. |
| -s | Specifies the data source for language model creation and modifying a model. |
| -t | Specifies the folders that contain the transcriptions or a list of files(training and test). |
| -u | Specifies the HTK tool and the configuration parameters to change for the tool. |
| -v | If specified, overrides any saved state information. |
| -w | Specifies the working directory. |
| -x | Specifies the extension for the transcription files. |
| -y | Specifies the type of data being added, when modifying a model. |
4.1 Projects
4.1.1 Creating
To create a new project specify the -P/--project option. The -P option must be followed by the folder where the project should be created and the name of the project. The -w option, followed by the path of the working folder, can be specified before the -P option. The -w option is optional.
Example:
./asr-builder.py -w /home/user/ -P test/ ASR_Project
The project 'ASR_Project' will be created in '/home/user/test/ASR_Project'.
4.1.2 Opening, Saving and Closing
You cannot open a project directly on the command line, rather ASR-Builder opens, saves and closes the specified project when you run a command.
4.1.3 Removing
To remove/delete a project, one needs only to delete the directory where the project is saved.
(back to the top)
4.2 Acoustic and Language Models
4.2.1 Creating an Acoustic Model
To create a new acoustic model one needs to specify the -A/--acousticmodel
option, preceeded by the required variable options. The required options are:
-p: The file for the project in which to create the new acoustic model.
-n: The name of the new acoustic model.
-d: The list of dictionaries for the project (either a list of files separated by spaces
and enclosed in double quotation marks or a file that lists the dictionaries).
-q: The questions file for tying phones (only for BIPHONE and TRIPHONE types).
-a: The folders that contain the training and test audio data or files that contain lists of the audio files.
-m: Specifies that the audio files are already in MFCC format.
-t: The folders with the training and test transcriptions or files that contain lists of the transcriptions.
-e: The extension of the audio files, if none is specified ASR-Builder assumes all files in
the specifed folders are audio files. [optional]
-x: The extension of the transcription files , if none is specified ASR-Builder assumes all
files in the specifed folders are transcription files. [optional]
-w: The working directory. [optional]
If a model with the same name exists the program will terminate with the appropriate
error message.
Important: Altough specifying extensions for data is optional the
data is expected to be in certain formats. Audio data is expected to be RIFF Wave files,
or in HTK MFCC format, if you want to use a different format, then you should change the
parameters for HCopy. Transcriptions are expected to be plain text although ASR-Builder
can remove punctuation and change the case, if specified.
Example:
./asr-builder.py -w /home/user/ -p
test/ASR_Project.proj -n newAM -a data/atrain data/atest -t data/ttrain data/ttest
-e wav -x txt -q data/eng_quests.hed -d "data/eng_main.dict data/eng_extra.dict" -A
This will open the 'ASR_Project' and create a model named 'newAM'. Training audio will be
added from the '/home/user/data/atrain/' folder and testing audio from the
'/home/user/data/atest/' folder. Only files with the '.wav' extension will be added.
Transcriptions for training and testing will be added from '/home/user/data/ttrain/' and
'/home/user/data/ttest/' respectively. Only transcriptions with the '.txt' extension will
be added. The '/home/user/data/eng_quest.hed' file containing questions for phone tying will
be added and lastly two dictionaries, '/home/user/data/eng_main.dict' and
'/home/user/data/eng_extra.dict' will be added.
4.2.2 Creating a Language Model
To create a new language model one needs to specify the -L/--languagemodel
option, preceeded by the required variable options. The required options are:
-p: The file for the project in which to create the new acoustic model.
-n: The name of the new acoustic model.
-s: The data source for the language model.
-w: The workingdirectory (optional).
If a model with the same name exists the program will terminate with the appropriate
error message.
Example:
./asr-builder.py -w /home/user/ -p
test/ASR_Project.proj -n newLM -s data/grammar.txt -L
This will create a new language
model named 'newLM' in the ASR_Project. It will add the file 'grammar.txt' to the model.
4.2.3 Running a script
To train, test or recognise with a model, specify the -R/--runscript
option preceeded by the required variable options. For more detailed information on
creating scripts, see Section 8.The variable options are:
-p: The file for the project in which to create the new acoustic model.
-n: The name of the new acoustic model.
-r: The name of the run script (either path or key).
-i: Ignore user input (optional).
-v: Override previously saved state information for a script (optional).
-w: The workingdirectory (optional).
Scripts can be specified by either a full path name or a key. The available ASR-Builder run
scripts are:
- AM_TRAIN_MONOPHONE_BASIC
- AM_TRAIN_MONOPHONE_MFCC
- AM_TRAIN_BIPHONE_BASIC
- AM_TRAIN_TRIPHONE_BASIC
- AM_TEST_MONOPHONE_BASIC
- AM_TEST_BIPHONE_BASIC
- AM_TEST_TRIPHONE_BASIC
During the process of parsing the script, should ASR-Builder encounter an error it will exit gracefully with an error message.
Example:
./asr-builder.py -w /home/user/ -p
test/ASR_Project.proj -n newAM -r AM_TRAIN_MONOPHONE_BASIC -R
This will train the
acoustic model named 'newAM' in the 'ASR_Project' project, with a basic monophone
training script. You will be prompted to run the script with the given HTK configuration,
to prevent the prompt from being displayed, specify the -i option.
4.2.4 Modifying a Model
To modify a model, specify the -R/--runscript option preceeded by the
required variable options. The variable options are:
-p: The file for the project in which to create the new acoustic model.
-n: The name of the new acoustic model.
-g: Tag/label for the data.
-s: The location of the data source.
-y: The type of data being added. Acceptable values are FILE, FOLDER AUDIO and TRANS.
-l: The location (folder) to copy the new data to, in the model. Only applicable for FILE
and FOLDER types. If the folder/location doesn't exist, it will be creaated. [optiona]
-c: Specifies the case that the text in the transcriptions must be changed to.
Available options are u/U (uppercase), l/L (lowercase) and n/N (no change). [optional]
-o: Specifies the punctuation to remove from the text in the transcriptions. The
punctuation is specfied as a string of alphanumeric characters (without any spaces).
[optional]
-w: The workingdirectory (optional).
The -c and -o options are identical to those in Section 4.2.1.
Example:
./asr-builder.py -w /home/user/ -p
test/ASR_Project.proj -n newAM -g NEW_DATA -s data/extra_data/ -y FOLDER -l extra/ -M
This will copy the folder '/home/user/data/extra_data/' to the 'newAM' model
in the 'ASR_PRoject' project. The data will be copied to the 'extra' folder and its
full path will be '/home/user/ASR_Project/newAM/extra/extra_data/'. The data will be
referenced by the tag/key 'NEW_DATA' in the model's file.
4.2.5 Configuring a Model
To configure the HTK parameters for a model through the CLI, you can specify
the relevant parameters for a HTK command and their values, using the -C/--configure option.
The -C command option takes a single argument. This argument can have one of the following
values, 'MODIFY', 'SAVE', or 'LOAD' (case is not important). Also, the -C command option
must be preceeded by the following variable options:
-p: The file for the project in which to create the new acoustic model.
-n: The name of the new acoustic model.
-u: The name of the HTK command to change the configuration for and the parameters and their
values to add, modify or delete. You can only specify one HTK command at a time but many
parameters for that command. The format is as follows: HTK_COMMAND=param_1:value_1:DEL,...
,param_n:value_n:DEL. If DEL is set to 't' or 'T' then the parameter will be deleted from
the configuration and you can omit the value. Values may be omitted but do not leave out
any the colons, example: HCopy=SOURCERATE::t will delete the parameter SOURCERATE from the
HCopy configuration. [Used if 'MODIFY' is specified]
-c: The name of the file to save/load the HTK configuration to/from. [Used if 'SAVE' or
'LOAD' is specified]
-w: The workingdirectory (optional).
The format for the file is (when using 'SAVE' or 'LOAD'), one configuration parameter per line, in the form 'TOOL:PARAMETER:VALUE:DELETE'. The fields are as follows:
- TOOL - Name of the HTK tool.
- PARAMETER - Name of the configuration parameter.
- VALUE - Value for the configuration parameter
- DELETE - If the paramter should be deleted or not, if it exists already. If the is true ['true' or 't'] then the VALUE field can be left blank.
Example 1:
./asr-builder.py -w /home/user/ -p
test/ASR_Project.proj -n newAM -u HCopy=SOURCERATE:16000:f,NUMCEPS:22:f -C modify
This will add or modify the SOURCERATE and NUMCEPS parameter in the HCopy configuration for
the 'newAM' model.
Example 2:
./asr-builder.py -w /home/user/ -p
test/ASR_Project.proj -n newAM -j /home/user/htk_full.cfg -C load
This will load the configuration in the file '/home/user/htk_full.cfg' into the 'newAM' model.
4.2.6 Viewing Model Keys and Other Information
To view certain information about a model one needs to specify the
-I/--viewinfo option. The -I command option must be preceeded by the following variable
options:
-p: The file for the project in which to create the new acoustic model.
-n: The name of the new acoustic model.
-f: The type of information to display. Acceptable options are: a/A (all information),
c/C (HTK configuration parameters) and m/M (the model keys/tags).
-w: The workingdirectory (optional).
If there is an error the program will terminate with the appropriate error message.
Example:
./asr-builder.py -w /home/user/ -p
test/ASR_Project.proj -n newAM -f A -I
This will display all the information
(the model's keys and HTK configuration) for the 'newAM' model from the 'ASR_Project'
project.
4.2.7 Preprocessing Options
To load or save preoprocessor configuration options or to run the preprocessor,
use the -O/--preprocessor option. The -O command option takes a single argument. This argument
can have one of the following values, 'SAVE', 'LOAD' or 'RUN' (case is not important). The
-O command option must be preceeded by the following variable options:
-p: The file for the project in which to create the new acoustic model.
-n: The name of the new acoustic model. [Only used with 'RUN']
-c: The name of the file to save/load the preprocessor configuration to/from. [Used if 'SAVE' or
'LOAD' is specified]
-w: The workingdirectory (optional).
If there is an error the program will terminate with the appropriate error message.
Example:
./asr-builder.py -w /home/user/ -p
test/ASR_Project.proj -n newAM -O RUN
This will run the preprocessor for
the 'newAM' model from the 'ASR_Project' project.
4.2.8 Removing
To remove a model one needs to specify the -V/--removemodel option. The
-V command option must be preceeded by the following variable options:
-p: The file for the project in which to create the new acoustic model.
-n: The name of the new acoustic model.
-w: The workingdirectory (optional).
If there is an error the program will terminate with the appropriate error message.
Example:
./asr-builder.py -w /home/user/ -p
test/ASR_Project.proj -n newAM -V
This will remove the 'newAM' model from the
'ASR_Project' project.
(back to the top)
5. Configuration
Currently there is no configuration of the the ASR-Builder system itself, but there are configuration options for HTK, on a per model basis. To changes these configuration options, see Sections 3.2.5 and 4.2.5.
(back to the top)
6. General Usage
For each new model a file containing default contexts (for use with the 'FILE_FROM_CONTEXT' function, see Section 7.1.3) is created. This file can be found in the 'contexts' folder under the new project and is called 'contexts_default.txt'. You can edit these contexts as needed or create your own file containing new contexts.
The format for the preprocessor configuration file is as follows. So far there are only two parameters, 'REGEX' and 'WORDCHK'. Each parameter is followed by '==' and then the value. The value for 'REGEX' is a comman separate list of regular expression and substitution text pair. Eache pair is separated by a colon. And each regular expression and substitution text value is delimited by a double quote (") at each end, and each regular expresion is preceeded by a 'r'. Example, REGEX==r"\.":"period",r"\,":"comma". The value for 'WORDCHK' can be true/t/false/f (case is not important).
(back to the top)
7. ASR-Builder Run Scripts
ASR-Builder performs training, testing, recognition or any other task using scripts. There are a handful of basic scripts that are provided with ASR-Builder. These are shown in the table below.
| Script Key | Short Description |
| AM_TRAIN_MONOPHONE_BASIC | Basic training script for a monophone based acoustic model. |
| AM_TRAIN_MONOPHONE_MFCC | Training script for a monophone based acoustic model, if the audio is already in MFCC format. |
| AM_TRAIN_BIPHONE_BASIC | Basic training script for a biphone based acoustic model. |
| AM_TRAIN_TRIPHONE_BASIC | Basic training script for a triphone based acoustic model. |
| AM_TEST_MONOPHONE_BASIC | Basic testing script for a monophone based acoustic model. |
| AM_TEST_BIPHONE_BASIC | Basic testing script for a biphone based acoustic model. |
| AM_TEST_TRIPHONE_BASIC | Basic testing script for a triphone based acoustic model. |
Users are by no means confined to using the default scripts and can modify the existing scripts or create entirely new ones. The script files have a .rs extension, although this is by no means a steadfast requirement. The commands, and their parameters, that can be used in the scripts are detailed below. The commands can generally be used in any order that is sensible. The test and recognition scripts are separate from the training scripts but if one wants, you can combine these into a single script.
(back to the top)
7.1 Basics
7.1.1 Script State Saving
It is important to note that ASR-Builder has a very basic state saving
mechanism when running scripts. When a script is run the system saves the number of the
last line in the script to be successfully run and a checksum of all the lines run prior
to the last line. So if you run the same script again it will run only from the first
line that was not run previously. This mechanism is meant to prevent the need to re-run
entire scripts due to syntax/value errors in the scripts.
If there is a change in the script before the last line that was successfully run, in
other words the checksum is different, then the entire script will be run again. Also
you can override the saved state by providing the '-v' argument on the command-line
or ticking the crelevant checkbox in the GUI (see Figure 11 below). In the GUI the
information display dialogue, shown just before a script is run, shows the script that will
be run and lines that are highlighted red are lines previously run successfully.
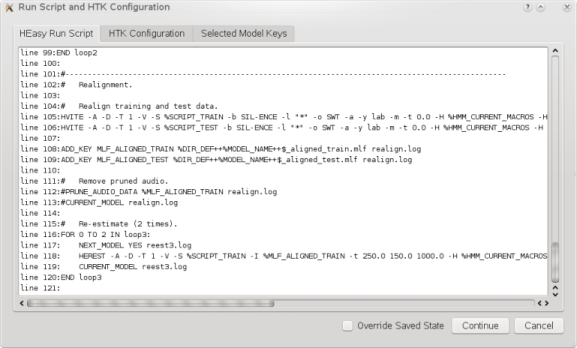
Figure 11: The information display dialogue, showing the script that will be run.
7.1.2 Script Syntax
The scripting interface for ASR-Builder is very simple but rather powerful. It only has three special operators, namely ++, % and $. The ++ operator allows for the concatenation of strings in a script file. Generally each string is either a folder or file name. When the % operator preceeds a string it indicates that a string is a key value for the model's dictionary and the corresponding lookup is performed. The $ operator preceeds a string that should be concatenated to the previous string to form a single value. In the script files, lines beginning with a # are regarded as comments. The examples below should make it clear how to use the operators.
Example:
- /home/user++file.txt - would be used to create /home/user/file.txt
- %MODEL_DIR++file.txt - would be used to create /home/user/model/file.txt if in the model's dictionary, MODEL_DIR contained /home/user/model
- /home/user++%MODEL_NAME++$_file.txt - would be used to create /home/user/newmodel_file.txt if in the model's dictionary, MODEL_NAME contained 'newmodel'
The operators can be used in any order to create values. The reason for allowing the use of dictionary keys is to streamline the script file and reduce unnecessary repetion of folder or file names.
The general layout of a command in a script is: COMMAND arg1 ... argN logFile
The 'COMMAND' is always uppercase and may contain underscores. The list of available commands is detailed in sections 6.1.2 and 6.1.3 below. The number of arguments depends on the command and can be zero. The 'logFile' argument is always required and specifies a name for the log file, do not specify a folder just the file name. The syntax for using external python scripts to override internal functions is slightly different and is explained in section 6.2 below.
Important: Currently ASR-Builder does not support line continuation to a new line, in other words a single command and all its arguments must be on a single line (Yes, this does make difficult to read the scripts sometimes).
ASR-Builder also supports nested for-loops. The syntax for a for-loop is as
follows:
FOR m TO n IN variable:
command 1
...
command p
END variable
The loop counter runs from n to m - 1. If the variable appears in the
code in the loop, it will be substituted by the current value of the loop counter. Code
within a loop can be indented to whatever level you like.
Example:
FOR 0 TO 3 IN loop1:
NEXT_MODEL YES reest.log
HEREST -S %SCRIPT_TRAIN -I %MLF_PHONES_TRAIN -H %HMM_CURRENT_MACROS -M %HMM_NEXT %MONOPHONES reest.log
CURRENT_MODEL reest.log
END loop1
This will loop three times (the loop counter will run from 0 to 2) and each time
re-estimate the current model and create a new one.
Available for the HTK functions is a method to capture output from these functions. The method uses regular expressions to get the required output, the output is then stored temporarily and can be accessed through the use of keywords, in the same way other information is accessed in the ASR-Builder scripting language. The captured output is valid for a single run through a script. Do not use keyword names that are already in use by the model as the output associated with these will be ignored. Also you can capture as many different pieces of output as you require. The syntax is fairly simple, the keyword and regular expresion pairs are listed between angular brackets after the HTK command and it parameters have been specified (after the log file). Each pair is separated by a comma, each keyword and regular expression in a pair is separated by a colon and each regular expression is enclosed by single quote marks. The syntax looks as follows:
<KEYWORD:'regular expression'>
An example:
HRESULT ... results.log <CORRECT:'Corr=.*(?= )',ACC:'Acc=.*'>
This will get the percentage correct from the output from HResults and store it under
the keyword 'CORRECT' and the accuracy from the output and store it under the keyword
'ACC'.
7.1.3 ASR-Builder Assistive Functions
ADD_KEY key value log_file
Used to add a new entry or modify an existing in the model.
Description of arguments:
- key (str) - the key of the new entry.
- value (str) - the value to associate with the key.
- log_file (str) - the name of the log file to write to.
NEXT_MODEL overwrite next_hmm log_file
Used to create the folder for next model and increment the necessary
entries in the model.
Description of arguments:
- overwrite (str) - specify to overwrite the model if it exists. A value of 'YES' enables overwriting [optional].
- next_hmm (int) - specify the number of the next HMM instead of using the built-in counter [optional].
- log_file (str) - the name of the log file to write to.
CURRENT_MODEL log_file
Used to set current model and update the necessary entries in the model.
Description of arguments:
- log_file (str) - the name of the log file to write to.
COPY source dest log_file
Used to copy a file or folder.
Description of arguments:
- source (str) - the path of the source file/folder.
- dest (str) - the path of the destination file/folder.
- log_file (str) - the name of the log file to write to.
MKDIR folder log_file
Used to create a folder.
Description of arguments:
- folder (str) - the path of the folder.
- log_file (str) - the name of the log file to write to.
CONCAT infile1 infile2 outfile log_file
Used to concatenate two files. The contents of the concatenated file is
sorted and duplicate items are removed. Each line is considered an item.
Description of arguments:
- infile1 (str) - path of the first file to concatenate.
- infile2 (str) - path of the second file to concatenate.
- outfile (str) - path of the file containing the output.
- log_file (str) - the name of the log file to write to.
GET_FILE_LIST folder ext key log_file
Used to get a list of files and add the list to a key in the model.
The files in specified folder are concatenated to form a string, the string is
added to the model.
Description of arguments:
- folder (str) - the folder to get the file listing from.
- ext (str) - the extension of the files to list ('*' will list all files).
- key (str) - name of the key that the list is associated with.
- log_file (str) - the name of the log file to write to.
FILE_FROM_CONTEXT file_name context subst_type subst_source log_file
Used to create a file using a context provided in another file.
The function allows substitution from either a parameter in the script file or from
another file. Also any keys will be replaced by their values. Note that the
'subst_type' and 'subst_source' parameters must be used in conjunction with one
another.
Description of arguments:
- file_name (str) - file containing the context.
- context (str) - the name of the context to use.
- subst_type (str) - the type of the substitute source, can be 'FILE', if it's a file or 'VAL' if it's passed via the 'subst_source' parameter [optional].
- subst_source (str) - the source of sustitution values, either a file containing items to be substituted or a single value that is substituted in [optional].
- log_file (str) - the name of the log file to write to.
A context is defined as follows:
DEFINE: context_name
KEY = KEY_NAME
FILE = edit_script_file_name
"contents"
"more contents"
"@repeated contents with & values from subst_source"
END: context_name
The context is bounded by 'DEFINE:' and 'END:' statements followed by the context name.
The 'KEY =' statement provides a name for the key to be used in the model's dictionary
and the 'FILE = ' statement provides the name for the edit script file. The contents of
the edit script is given between double quotation marks on multiple lines. A line of
content that begins with a '@' will be repeated for every value in the 'subst_source'.
Where the value replaces the '&' character in the line of contents. This is useful
when a line has to be repeated for each HMM in a list. Also the same syntax used in
the ASR-Builder scripts can be used.
Example:
Given a context as follow:
DEFINE: mkbi_hed
KEY = EDIT_MKBI_HED
FILE = %DIR_CONFIG++mkbi.hed
"CL %DIR_DEF++biphones.phn"
"@TI T_& {(&+*).transP}"
END: mkbi_hed
The 'subst_source' contains the following:
D
CH
A
T
And '%DIR_CONFIG' contains /home/test/config and '%DIR_DEF' contains /home/test/def
The new file will look as follows:
CL /home/test/def/biphones.phn
TI T_D {(D+*).transP}
TI T_CH {(CH+*).transP}
TI T_A {(A+*).transP}
TI T_T {(T+*).transP}
CREATE_WORDS_LIST file_name folder special log_file
Used to get a list of all the unique words used in a set of transcriptions.
The function adds in the words: SENT-START, SENT-END, SILENCE.
Description of arguments:
- file_name (str) - path of the file to write the word list to.
- folder (str) - the folder to search for transcriptions in. All files found in the folder are considered transcriptions.
- special (str) - if equal to 'false' then SENT-END and SENT-START are not added.
- log_file (str) - the name of the log file to write to.
CREATE_MLF file_name folder log_file
Used to create a MLF for a set of transcriptions.
Description of arguments:
- file_name (str) - path of the file to write the labels to.
- folder (str) - the folder to search for transcriptions in. All files found in the folder are considered transcriptions.
- prefix (str) - the path to prefix to each file name in the MLF [Optional].
- log_file (str) - the name of the log file to write to.
CREATE_LIST_FROM_MLF infile_name outfile_name log_file
Used to create a list of all the unique words/phones used in a MLF.
Description of arguments:
- infile_name (str) - path of the MLF to get the list from.
- outfile_name (str) - path of the file that will contain the list of unique words/phones.
- log_file (str) - the name of the log file to write to.
CREATE_SCRIPT file_name folder ext log_file
Used to create a HTK script file, containing a list of files.
Description of arguments:
- file_name (str) - path of the file to write the script to.
- folder (str) - the folder to search for files.
- ext (str) - the extension of the files to add to the script ('*' will list all files).
- log_file (str) - the name of the log file to write to.
FIX_HMM_LIST infile_name outfile_name log_file
Used to remove the short pause ('sp') from the initial HMM list if it
exists. The function will create another list of HMMs with the short pause ('sp')
included. The list of HMMs without the short pause are written to the file specified
by 'infile_name'.
Description of arguments:
- infile_name (str) - the path of the file containing the list of HMMs.
- outfile_name (str) - the path of the file containing the list of HMMs including the short pause ('sp').
- log_file (str) - the name of the log file to write to.
CREATE_HMM hmm_name target vec_size states fw bk rn log_file
Used to create a prototype HMM.
Description of arguments:
- hmm_name (str) - defines the name of the HMM [default = proto].
- target (str) - defines target for the HMM, see HTK documentaion for more information [default = MFCC_0_D_A].
- vec_size (int) - defines the size of the vector [default = 39].
- states (int) - defines the total number of states [default = 5].
- fw (int) - number of forward jumps allowed [default = 1].
- bk (int) - number of backward jumps allowed [default = 0].
- rn (int) - can remain in the current state or not [default = 1].
- log_file (str) - the name of the log file to write to.
CREATE_MACRO vec_size target log_file
Used to create the macro file for use with HERest. The function will create
a macro in the file pointed to by the 'HMM_NEXT_MACROS' key. The file used for input is
the 'vFloors' file created by the 'HCompV' function.
Description of arguments:
- vec_size (int) - the length of the vector.
- target (str) - the target type, example 'MFCC_0_D_A, see HTK documentaion for more information.
- log_file (str) - the name of the log file to write to.
CREATE_INIT_MMF hmm_list model_name vec_size target log_file
Used to create the initial MMF file containing all the HMMs.
The function will create a MMF in the file pointed to by the 'HMM_NEXT_MMF' key. The
files used for input are the initial HMM, created by the 'HCompV' function, and the
list of HMMs.
Description of arguments:
- hmm_list (str) - path of the file containing the list of HMMs.
- model_name (str) - name of the model file containing the initial protoype, that is used as the basis for the MMF.
- vec_size (int) - the length of the vector.
- target (str) - the target type, example 'MFCC_0_D_A, see HTK documentaion for more information.
- log_file (str) - the name of the log file to write to.
INSERT_TEE_DEF infile_name outfile_name hmm_name copy_from copy_state log_file
Used to insert a Tee-definition into the given MMF-file.
The norm is to create a 'sp' HMM model from the 3rd state of 'sil'.
Description of arguments:
- infile_name (str) - path of the input file.
- outfile_name (str) - path of the file containing the new Tee-definition.
- hmm_name (str) - name of the Tee-definition.
- copy_from (str) - name of the HMM to base the Tee-definition on.
- copy_state (int) - the state in the HMM to base the Tee-definition on.
- log_file (str) - the name of the log file to write to.
CREATE_FULL_LIST infile_name outfile_name log_file
Used to create a full list of phone combinations found in a dictionary.
Description of arguments:
- infile_name (str) - path of the dictionary to use.
- outfile_name (str) - path of the file containing the list of phone combinations.
- add_sp (str) - option to add a 'sp' to the list. Any form of 'TRUE' (uppercase, lowercase, mixedcase will work [optional].
- log_file (str) - the name of the log file to write to.
CREATE_CLUSTER_TREE outfile_name type threshold cmd states trees tiedlist fulllist stats log_file
Used to create the tree for clustering the biphones/triphones when tying.
Description of arguments:
- outfile_name (str) - path of the file containing the full cluster tree.
- type (str) - the type of phone-combinations that will be created. Can be 'BI_L', 'BI_R' or 'TRI'.
- threshold (int) - the threshold to use during tying. See the HTK documentation for more information.
- cmd (str) - the command used during tying. See the HTK documentation for more information.
- states (int) - the number of states.
- trees (str) - path of the file that will contain the trees.
- tiedlist (str) - path of the file that will contain the list of the tied phone combinations.
- fulllist (str) - path of the file containing the full list of phone combinations.
- stats (str) - path of file with statistics from re-estimation.
- log_file (str) - the name of the log file to write to.
CREATE_FLAT_GRAMMAR infile_name outfile_name log_file
Used to create a simple flat grammar (language model) using a list of HMMs.
Description of arguments:
- infile_name (str) - path of the file listing of HMMs.
- outfile_name (str) - path of the file that will contain the flat grammar.
- log_file (str) - the name of the log file to write to.
CREATE_SPECIAL_DICT file_name log_file
Used to create a dictionary with the silence, sent-start and sent-end
entries.
Description of arguments:
- file_name (str) - path of the file that will contain the special dictionary.
- log_file (str) - the name of the log file to write to.
PRUNE_AUDIO_DATA file_name log_file
Used to remove pruned audio data from the training script. The file should
be the most recent MLF. The file names found will be used to create a new training script
(will overwrite the existing script).
Description of arguments:
- file_name (str) - the file that will be searched for the file names of the audio data that has not been pruned.
- log_file (str) - the name of the log file to write to.
7.1.4 HTK Wrapper Functions
The HTK commands take paramters in exactly the same manner as on the CLI
except one can use the ASR-Builder syntax to specify arguments and the last parameter
must be the name of a log file.
The HTK commands are as
follows:
CLUSTER
HBUILD
HCOMPV
HCOPY
HDMAN
HEREST
HHED
HINIT
HLED
HLIST
HLMCOPY
HRESCORE
HLSTATS
HPARSE
HQUANT
HREST
HRESULTS
HSGEN
HSMOOTH
HVITE
LADAPT
LBUILD
LFOF
LGCOPY
LGLIST
LGPREP
LLINK
LMERGE
LNEWMAP
LNORM
LPLEX
LSUBSET
(back to the top)
7.2 Advanced Options
7.2.1 Overloading Internal Functions
You can override some of the assistive functions in ASR-Builder. In order to override a function, one needs to write the new function in a separate Python script. The new function needs to accept 3 variables, a dictionary, a list and a string in that order. An example of a function header is given below:
def myFunction(myDict, myList, myString):
The dictionary variable is the model's dictionary, so that the overloaded function has access to the contents of the model. The list variable is a list of the parameters that were passed to the function in the script and the string is the name of the log file (given in the script). ASR_Builder will catch any exception raised by the overloaded function but it is advised to make sure that the exceptions give sufficient error information. The overloaded function is called from the script in the following manner:
[module path] COMMAND arg1 ... argN log_file
The 'module' is the name of the Python script and 'path' is the path to where the script is located. The 'COMMAND' parameter is the name of the command/function that is being overloaded, the 'arg1...argN' parameter are arguments passed to the command and 'log_file' is the name of the log_file. The functions that can be overridden are:
| Function Name | Script Command |
| createWordsList | CREATE_WORDS_LIST |
| createMLF | CREATE_MLF |
| createListFromMLF | CREATE_LIST_FROM_MLF |
| createScript | CREATE_SCRIPT |
| fixHMMList | FIX_HMM_LIST |
| createHMM | CREATE_HMM |
| createMacro | CREATE_MACRO |
| createInitMMF | CREATE_INIT_MMF |
| insertTeeDef | INSERT_TEE_DEF |
| createFullList | CREATE_FULL_LIST |
| createClusterTree | CREATE_CLUSTER_TREE |
| createFlatGrammar | CREATE_FLAT_GRAMMAR |
| createSpecialDict | CREATE_SPECIAL_DICT |
| pruneAudioData | PRUNE_ADUDIO_DATA |
Example:
- def createScript(model, args, log_file):
- print "Type model: %s" %type(model)
- print "Arguments:\n"
- i = 0
- for arg in args:
- print "Argument %d: %s" %(i, arg)
- i += 1
- print "Log file: %s" %log_file
In order to call this overridden function from a script, use:
[override /home/user/test] CREATE_SCRIPT arg1 arg2 test.log.
Where the function is located in a Python script named 'override.py', in the
'/home/user/test' folder.
7.2.2 External Python Scripts
If you wish to create an entirely new Python module, but have access to the model's dictionary, then one needs to create an Python module that meets certain requirements. The module needs to have a new class that needs to accept a SQlite object and a string when its instantiated. The SQlite object contains the model's dictionary, so that the class has access to the contents of the model and the string is the name of the log file given in the script), you need to import SQliteModel from SQlite.py from the ASR-Builder package. ASR_Builder will catch any exception raised by the class but it is advised that your class catches exceptions or at the very least to make sure that the exceptions give sufficient error information.
The syntax to call a method from an external Python module is as follows:
[module function class path] EXTCLASS log_file
The 'module' argument is the name of the Python module, the 'function' argument is the name of the function to call from the class, the 'class' argument is the name of the class and the 'path' argument is the path to where the module is located. The 'EXTCLASS' parameter is the command that informs ASR-Builder to expect an external Python module and 'log_file' is the name of the log_file. The 'function' is the starting point of processing for your module. For example:
Example:
- class Outside:
- def __init__(self, sqliteDB, log_file):
- self.sqliteDB = sqliteDB
- self.model = self.sqliteDB.modelGet()
- self.log = log_file
- def __init__(self, sqliteDB, log_file):
-
- def start():
- print "Name: %s" %self.name
- print "Model type: %s" %type(self.sqliteDB)
- for key in self.model.keys():
- print 'Key: %s Value: %s' %(key, self.model[key])
- print "Log file: %s" %self.log
- print "Can call other functions from here."
- def start():
In order to call this external module, use:
[External start Outside /home/user/test] EXTCLASS test.log.
Where the module is located in a file named 'External.py', in the '/home/user/test'
folder. The module contains a class called 'Outside' and the class has a function
called 'start()'.
(back to the top)
